Guide to Packing a Travel Backpack Efficiently
three climates with just a 40L backpack—and it finally clicked. Packing efficiently isn’t about being minimalist for the aesthetic; it’s about not wanting to set your bag on fire halfway through a trip.
This is the system I’ve refined over years of overpacking, underpacking, and once carrying a cast-iron pan through Lisbon (don’t do that).
Step 1: Start With the Right Backpack (Before You Even Pack)
In my experience, efficiency starts way before the packing cubes show up. The backpack itself makes or breaks the whole game.
Size & volume
When I tested different sizes, I found that 35–45L is the sweet spot for most trips up to 2–4 weeks if you’re willing to do laundry. Anything bigger and you’ll fill it with “just in case” junk. Anything smaller and you’ll be wearing the same T-shirt in too many photos.
Look for:
- Carry-on compatible: Around 45L or smaller, under ~22 x 14 x 9 inches (check airline specs—Delta, United, etc. post exact limits on their sites).
- Internal frame or decent structure: Helps distribute weight to your hips instead of wrecking your shoulders.
- Front-loading (clamshell) opening: Top-load-only backpacks are packing Tetris on hard mode.
When I switched from a top-loading hiking pack to a clamshell travel backpack, my unpacking time in hostels dropped from 15 minutes of chaos to about 3 minutes of “zip–grab–go”.
Fit & comfort
The most efficient backpack is the one you can actually carry for a mile without crying.
From trial and error:
- Get padded hip belts – they should rest on your hip bones, not your waist.
- Look for load lifter straps (those little angled straps at the top of the shoulder straps). They pull weight closer to your back so it doesn’t drag you backward.
- Try on loaded, not empty. Stores like REI will literally hand you sandbags to test — highly recommend.
Step 2: Ruthless Pre-Packing Edit (The “Floor Test”)
Before anything enters the backpack, I do what I call the floor test.
I lay everything I think I need on the floor or bed. Then I:
- Remove duplicates (no, I don’t need three black T-shirts that look almost identical).
- Remove “aspirational” items (the extra pair of shoes “in case I suddenly become a nightclub person” has never once been worth it).
- Apply my rule: If it doesn’t get used at least twice a week, it doesn’t come.
According to a 2023 Forbes Travel survey, around 62% of travelers admit they overpack and 28% say they wear less than half of what they bring. I’m definitely in that 28% when I don’t do the floor test.
Step 3: Build a Capsule Wardrobe That Actually Packs Flat
When I tested different clothing strategies, the biggest game-changer was packing like a capsule wardrobe brand, not like a vacation mood board.
My general clothing formula (for ~1–3 weeks)
Adjust for climate, but this works shockingly well:
- 3–4 shirts (quick-dry or merino if you can swing it)
- 2 pairs of pants or 1 pant + 1 shorts
- 1 light mid-layer (fleece or thin sweater)
- 1 packable jacket (down or synthetic)
- 4–5 pairs of underwear
- 3–4 pairs of socks (wool or synthetic > cotton)
- 1 pair of comfortable walking shoes (on your feet, not in the bag)
- Optional: 1 “nicer” outfit that’s still lightweight
The trick is neutral colors that mix and match. Everything should go with everything else. When I fought this and packed “fun” one-off outfits, I ended up with a colorful pile of fabric that only worked in specific pairings—and took up a ton of space.
Merino wool shirts and socks are pricey, but when I tested them, I could wear them 2–3 days without smelling like a lost locker room. They also dry fast, which matters if you’re doing sink laundry.
Step 4: The Packing Order That Changes Everything
The way you load your backpack affects comfort, accessibility, and how many times you have to dig to the bottom for that one cable.
Here’s the load-out system that’s worked best for me:
1. Heavy stuff: middle, close to your spine
Put dense, heavy items here:
- Packing cube with pants and heavier clothing
- Toiletry bag (if it’s not liquid-heavy)
- Tech organizer with chargers and power bank
When I first started backpacking, I made the mistake of stuffing heavy things at the bottom. After a couple of 20-minute walks from train stations, my shoulders felt like I’d been carrying small refrigerators. Shifting the weight up and in toward my spine made a massive difference.
2. Soft stuff: bottom and gaps
Fill the bottom and side gaps with soft, compressible items:
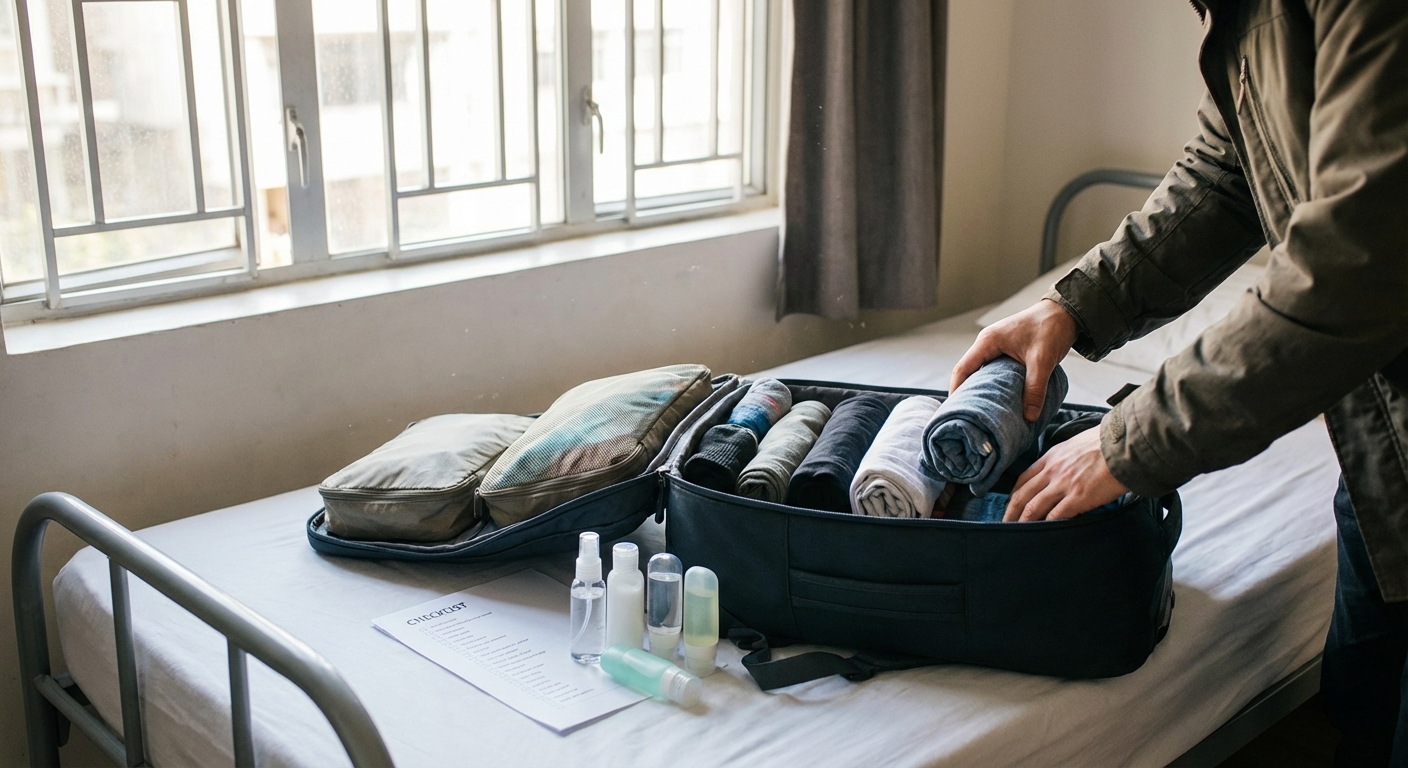
- Rolled T-shirts
- Underwear and socks
- A lightweight travel towel (rolled or stuffed)
These act as shock absorbers for your back and for your gear.
3. Light, bulky items: top
At the top, stash:
- Jacket or hoodie
- Snacks
- Hat, gloves (if needed)
You want things you might grab during transit near the top so you’re not excavating mid-flight.
4. Quick-access zones
Use exterior pockets for:
- Passport, wallet (ideally in a small RFID or zip pouch)
- Pen (border forms still exist, somehow)
- Earphones, lip balm, hand sanitizer
I learned the hard way not to put anything irreplaceable in unsecured exterior pockets. One unexpected jostle in a crowded metro and… goodbye favorite sunglasses.
Step 5: Rolling vs Folding vs Packing Cubes (I Tested All Three)
When I tested different methods on the same gear, here’s what actually worked:
Rolling
- Great for: T-shirts, underwear, sleepwear, workout clothes
- Pros: Saves space, easy to see everything, fewer creases in casual fabrics
- Cons: Not amazing for structured fabrics or dress clothes
Folding (flat stacking)
- Great for: Button-down shirts, chinos, dresses that wrinkle easily
- Pros: Keeps some structure, less wrinkling
- Cons: Becomes a messy pile if you’re constantly digging
Packing cubes
I was skeptical of packing cubes at first—felt like an Instagram trap. Then I tried them.
What worked best for me:
- 1 cube for tops
- 1 cube for bottoms
- 1 small cube for underwear and socks
Pros from my testing:
- Compress clothes slightly (especially compression cubes)
- Keep your bag organized even after multiple stays
- Make repacking way faster
Cons:
- Add a tiny bit of weight
- You can over-compress, wrinkle your clothes, and hide how much you’re bringing
In my experience, a combo system wins: fold nicer clothes inside cubes, roll casual stuff in there or free-floating.
Step 6: Toiletries and Liquids Without the Chaos
I used to be the person with a full-sized shampoo bottle wrapped in a grocery bag. Shockingly, that leaked.
What I do now:
- Use refillable 50–100ml bottles for shampoo, conditioner, body wash.
- Switch to solid versions where possible (bar soap, solid shampoo). Less mess, no TSA drama.
- Put all liquids in a separate, quick-grab clear pouch for airport security.
Evidence-based tip: The TSA 3-1-1 rule (3.4 oz / 100 ml bottles, 1 quart-size bag, 1 per passenger) is strictly enforced in many airports. Having your liquids separate saves so much time and weird fumbling at security.
My rule: no “just in case” full-size toiletries. If I run out, I buy locally. It’s also a weirdly fun way to discover international toothpaste.
Step 7: Tech & Documents – Organized, Not Paranoid
On one trip, I had my passport, boarding pass, backup cards, cash, and phone all in different pockets. It felt like a scavenger hunt at every checkpoint.
Now I:
- Use a flat travel wallet or small pouch for: passport, cards, some cash, and copies of key docs.
- Store digital backups of my passport, IDs, and reservations in an encrypted cloud folder and offline on my phone.
- Keep tech in a dedicated organizer: charging cables, adapters, earbuds, power bank.
When I tested not having a tech pouch, cables ended up strangling everything in my bag. With one, I know exactly where my charger is when the airport outlet is at 12% battery panic.
Step 8: Weight Management – Your Future Self Will Thank You
There’s a fascinating correlation between pack weight and enjoyment that I’ve felt personally: above a certain load, everything becomes more stressful—stairs, metro, walking those “oh, it’s only 10 minutes from the station” distances.
I try to keep my backpack under 10 kg (22 lbs) for carry-on trips. The U.S. Occupational Safety and Health Administration (OSHA) has ergonomic guidelines suggesting that frequent lifting above 23 kg (around 50 lbs) can increase injury risk; for travel, even 15 kg starts to feel awful fast when it’s on your back and you’re tired.
How I keep weight down:
- Limit myself to one extra pair of shoes max, and only if they’re light.
- Avoid “single-use” gadgets (that travel clothesline that never got used… yeah).
- Choose fabrics that are light, quick-drying, and layerable instead of heavy, bulky items.
The Honest Downsides of Packing This Efficiently
I won’t pretend this style of packing is perfect.
Trade-offs I’ve noticed:- You’ll repeat outfits. If you’re someone who loves big fashion variety on trips, this’ll feel restrictive.
- You’ll sometimes wish you had that one extra “just in case” item you left behind.
- Sink laundry or quick laundromat runs become part of your routine.
But the upsides for me have heavily outweighed all that: I’m less stressed in transit, faster through airports, and more willing to walk instead of grabbing a taxi just because of my bag.
When I tested extremely light packing versus my old “kitchen sink” style, the biggest difference wasn’t just physical—it was mental. I stopped thinking about my stuff and started paying more attention to where I was.
And that’s the real point of packing a travel backpack efficiently: not to win some minimalist contest, but to make your gear quietly support your trip instead of constantly demanding attention.
If you try even half of these strategies on your next trip, your future, less-sweaty self lugging that backpack down a cobblestone street will be very, very grateful.
Sources
- TSA - 3-1-1 Liquids Rule - Official guidelines on carrying liquids in hand luggage.
- Forbes – 2023 Summer Travel Survey - Data and insights on traveler packing and behavior.
- REI Co-op – How to Fit and Adjust a Backpack - Expert advice on backpack fit and load distribution.
- OSHA – Ergonomics and Musculoskeletal Disorders - Background on safe load handling and ergonomic considerations.
- MIT Medical – Travel Health Tips - Practical recommendations for staying organized and healthy while traveling.