Organization Strategies to Reduce Household Clutter
the floor. That was the moment I realized: my “organized piles” were just… piles.
Since then, I’ve tested dozens of organization systems in real homes (mine, friends’, a couple of very brave relatives’), and I’ve learned that reducing clutter isn’t about buying more bins. It’s about changing how stuff flows through your home.
Below are the organization strategies that actually worked for me long-term—no color-coded perfection required.
Step 1: Decide Your “Clutter Zones” (On Purpose)
When I first started, my mistake was trying to keep everything neat everywhere, all the time. That’s a fast track to burnout.
What helped was choosing intentional clutter zones:
- A basket by the front door for keys, mail, sunglasses
- One “drop zone” on the kitchen counter (a literal placemat-sized area)
- A tray on the bedroom dresser for jewelry, wallet, charger
When I tested this, something wild happened: instead of random chaos, the mess had boundaries. And boundaries are easier to maintain.
Professional organizers call this “containerizing” — you contain a category (like daily carry items) in a specific, limited space. When that space is full, it’s your cue to edit.
Why it works:Research on visual clutter and stress backs this up. A well-known UCLA study on 32 middle-class families found that high household clutter was linked with elevated cortisol levels, especially for mothers (UCLA’s Center on Everyday Lives of Families, 2012). Containment reduces visual noise, and your nervous system feels it.
Step 2: The 10-Minute Clutter Blitz (That I Actually Do)
I’ve tried the “I’ll declutter the entire house this weekend” approach. I also failed that approach.
What works far better for me is a 10-minute clutter blitz once or twice a day:
- Set a timer for 10 minutes.
- Choose one micro-area: coffee table, bathroom counter, entryway bench.
- Do three things only:
- Trash or recycle obvious junk
- Return items to their “home” (more on that in a sec)
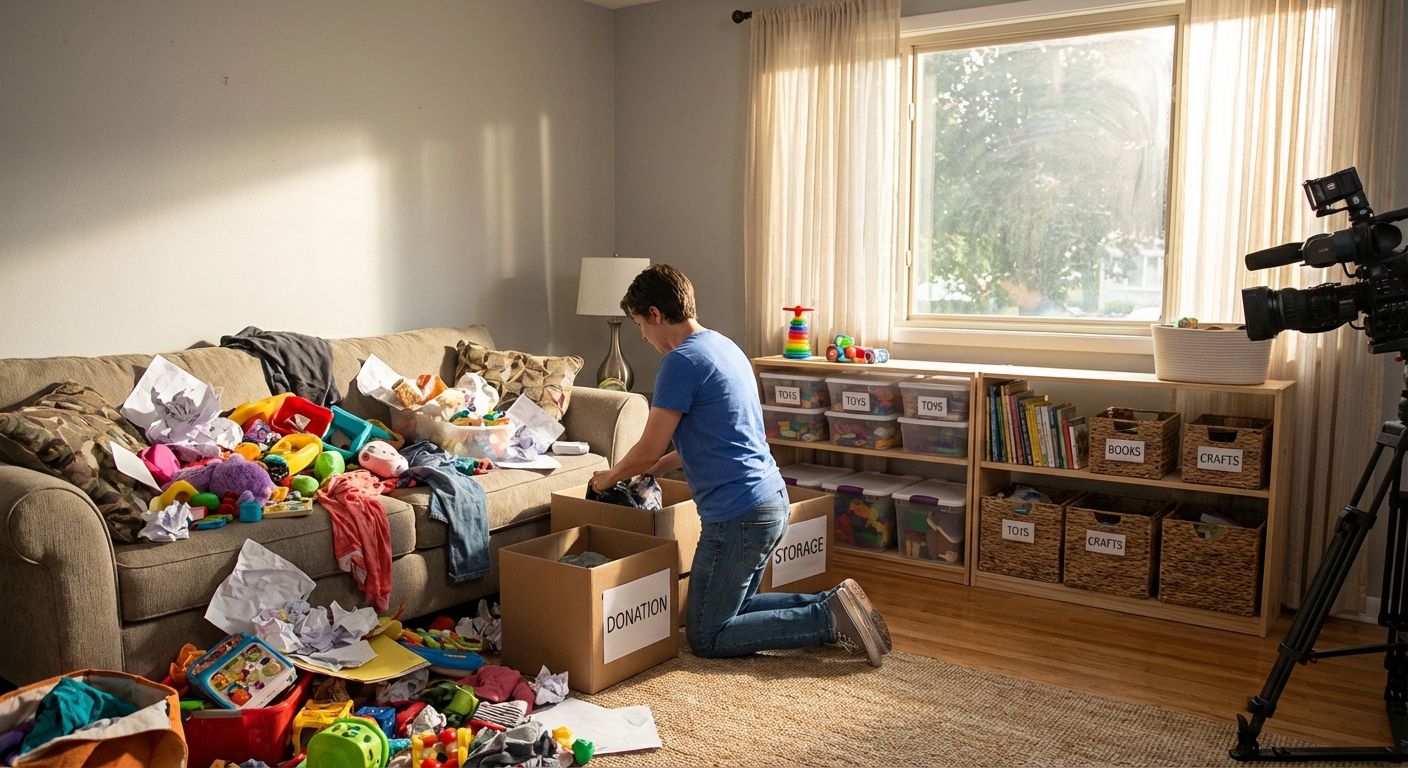
- Set aside donations in one dedicated bag or bin
Most days I stop when the timer goes off. Some days, when I’m on a roll, I keep going—but I never have to.
I started tracking this for a month and noticed a pattern: the spaces I hit with the 10-minute blitz three or more times stayed mostly clutter-free without a major overhaul.
Pro tip: I keep one permanent “donate” tote in my closet. When it’s full, it goes straight to the donation center. No extra sorting, no “I’ll-do-it-later” pile breeding in the hallway.Step 3: Give Every Item a “Home Address”
In my experience, clutter is usually a decision problem, not a storage problem. When I ask, “Where does this go?” and I don’t have an answer, that thing becomes clutter.
So I started giving items a “home address” and saying it out loud:
- “Tape lives in the utility drawer next to the scissors.”
- “Board games live in the hallway cabinet, bottom shelf.”
- “Kid art lives in the orange file box under the desk.”
When I tested this with a client who has three kids, we turned it into a game: every time the kids put something back in the right “home,” they got a point. After two weeks, they knew the addresses better than the adults.
This is a fundamental principle in professional organizing: a place for everything, and everything returns to its place. It sounds cliché, but it’s lethal against clutter.
Downside:It takes a few weeks for new “addresses” to become automatic. During that time, you’ll repeat yourself a lot and it’ll feel slightly tedious. But once it sticks, daily pickup is way faster.
Step 4: Use “Just-Right” Storage (Not Pinterest Storage)
I went through a phase where I bought pretty baskets with zero plan. Shocking no one, the baskets ended up… as more clutter.
What finally worked was choosing storage that matched how I actually live, not how I wished I lived.
Some examples that made a big difference:
- Open bins for kids’ toys instead of lidded boxes. Kids will not lovingly re-stack lids.
- Shallow drawers or trays for makeup and bathroom items so nothing can hide in the back.
- Vertical storage for cutting boards, laptops, trays—using file holders in the kitchen cabinet and office.
- Clear bins in the pantry so I can see when I’m about to buy my third bag of rice.
There’s a reason professional organizers love clear, labeled containers: research on choice architecture shows we’re more likely to use (and put away) items that are visible and easy to access.
Important limitation:You don’t need a single matching container set to be organized. Mix and match works fine. I often start clients with shoeboxes, old gift boxes, and jars and only invest in nicer pieces once we know what sizes and shapes we actually need.
Step 5: The “One In, One (Or Two) Out” Rule
The harsh truth I had to learn: you cannot organize your way out of too much stuff.
So I started using a simple rule: whenever something new comes in, something else has to go out.
- New pair of jeans? One old pair leaves.
- New mug from that cute coffee shop? One—or two—mugs from the back of the cabinet go to the donate tote.
This aligns with what decluttering experts like Marie Kondo and Dana K. White preach in different ways: your home has a finite container size. When it’s full, you’re over capacity.
I won’t lie—this rule can feel annoying at first. But over time, it made me a much more intentional shopper. I started asking, “What in my closet is this better than?” If the answer was “nothing,” I didn’t buy it.
Step 6: Create Friction for Incoming Clutter
One of the sneaky sources of clutter in my home was paper: mail, school flyers, random printouts, receipts. I’d stack them with good intentions and never deal with them.
What helped was building tiny speed bumps into my routines:
- I put a recycle bin right next to where I open mail, so junk mail never even hits the counter.
- I set my bank, utilities, and insurance to paperless and unsubscribed from most catalogs.
- I take a photo of event flyers and add them to my calendar, then recycle the paper on the spot.
According to the U.S. Environmental Protection Agency, the average American used approximately 644 pounds of paper per year as of the early 2000s, and while digitalization has reduced some categories, mail and packaging are still huge sources of waste and clutter. Reducing the inflow matters as much as decluttering the backlog.
You can use the same friction trick with non-paper clutter:
- Keep a small “returns” bag in your car so online returns don’t pile up by the door.
- Have a designated shelf or bin for borrowed items (books, tools) so they don’t vanish into the house.
Step 7: Seasonal “Reset” Instead of Massive Overhauls
Twice a year—spring and fall—I do a household reset. Not a full gut, just a focused check-in:
- Flip hangers in my closet and donate whatever I haven’t worn in a year.
- Empty one kitchen cabinet at a time and remove duplicates (no one needs six spatulas… I checked).
- Go through bathroom products and toss expired items.
I time this with natural life changes: start of school, start of summer, post-holiday. Research on habit formation from BJ Fogg at Stanford and others shows that “fresh start” moments—new seasons, birthdays, moves—are powerful triggers for behavior change. I’ve found leaning into those makes decluttering less of a fight.
Reality check:You won’t get everything done every season. I certainly don’t. I pick the rooms that have been annoying me the most and start there. Progress beats perfection every single time.
What Actually Stuck (And What Didn’t)
After a few years of experimenting, here’s what’s been sustainable for me:
Stuck long-term:- 10-minute clutter blitzes
- Dedicated donate bin that’s always there
- Clear “home addresses” for common items
- One in, one out (most of the time)
- Overly detailed labels (I don’t need “black fine-tip markers” vs “blue medium-tip markers” bins)
- Systems that rely on everyone folding clothes perfectly
- Anything that requires more than 2 steps to put something away
Your mileage may vary. If you love hyper-detailed systems, go for it. But if you’ve struggled with clutter for years, my honest take is: simpler is safer. Fewer steps, fewer rules, more realistic expectations.
And if your home doesn’t look like a showroom? Same. Mine has a Lego corner, a “perpetual project” pile on my desk, and a kitchen junk drawer that’s just… less junky than it used to be.
The goal isn’t perfection. It’s a home where you can find your passport at 11 p.m. without turning your bedroom into a crime scene.
Sources
- UCLA – Center on Everyday Lives of Families (CELF) - Research on family life, clutter, and stress in middle-class homes
- U.S. Environmental Protection Agency – Paper and Paper Products - Data on paper use, waste, and environmental impact
- Stanford University – BJ Fogg Behavior Design Lab - Research and insights on habit formation and behavior change
- BBC Future – Why clutter is bad for your health - Overview of scientific findings on clutter, cognition, and stress
- New York Times – The Unbearable Heaviness of Clutter - Journalistic look at the emotional and practical impact of clutter